
Scaffolding is a versatile block in Minecraft that provides a quick and easy way to reach high places. Whether you’re building a tower, a castle, or simply exploring a cave, scaffolding can make your journey much easier. There are many ways to build scaffolding, but this guide will provide you with the most basic and efficient method.
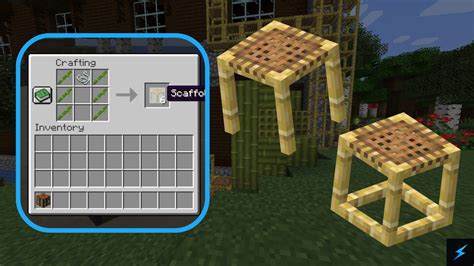
To craft scaffolding, you will need bamboo. Bamboo can be found in jungle biomes, and it grows in tall, green stalks. Once you have gathered some bamboo, open your crafting table and place the bamboo in the center of the top row. This will craft six scaffolding blocks.
To place scaffolding, simply hold the blocks in your hand and right-click on the block you want to attach them to. Scaffolding can be attached to any solid block, and it can extend up to six blocks high. You can also place scaffolding on top of other scaffolding blocks, whic allows you to reach even greater heights.
Selecting the Right Materials
Laying the foundation for a sturdy and reliable scaffolding in Minecraft begins with the selection of appropriate materials. In this context, the ideal candidate is a material that is both resilient and readily available. While various options exist, the most suitable choices are as follows:
Wooden Planks:
At first glance, utilizing wooden planks for scaffolding might seem like an obvious decision. They are easy to obtain, inexpensive, and straightforward to work with. However, wooden planks have a significant drawback: vulnerability to fire. A single stray spark could swiftly escalate into a devastating blaze, potentially jeopardizing the scaffolding’s integrity and the safety of those nearby.
Stone Bricks:
Stone bricks offer a substantial upgrade in durability compared to wooden planks. Their flame resistance ensures they won’t succumb to accidental ignition, providing peace of mind and minimizing the risk of catastrophic damage. Acquiring stone bricks does require some effort in gathering and processing stone, but the improved durability justifies the additional investment.
Iron Bars:
Iron bars represent the pinnacle of resilience in the realm of Minecraft scaffolding materials. Their exceptional durability makes them virtually impervious to fire and most forms of damage. Additionally, they are relatively easy to obtain by smelting iron ore, which can be found in abundance throughout the Minecraft world.
| Material |
Pros |
Cons |
| Wooden Planks |
Easy to obtain, inexpensive, straightforward to work with |
Vulnerable to fire |
| Stone Bricks |
Durable, flame-resistant |
Requires effort to gather and process stone |
| Iron Bars |
Exceptionally durable, fireproof, easy to obtain |
None |
Preparing the Framework
The scaffolding’s framework provides the backbone for the entire structure. To prepare it effectively, follow these steps:
1. Gather the Necessary Materials
You will need plenty of bamboo sticks, string, and ladders. Bamboo sticks serve as the main support elements, while string connects them for stability. Ladders facilitate vertical movement within the scaffolding.
2. Build the Base Layer
Start by placing a row of bamboo sticks on the ground, parallel to the intended direction of your scaffolding. This base layer forms the foundation and determines the length of the scaffolding.
3. Interconnect with String
Take a string and tie it tightly around each bamboo stick in the base layer. This creates a horizontal support structure that prevents lateral movement and stabilizes the framework.
4. Add Vertical Supports
To increase the height of the scaffolding, add another layer of bamboo sticks perpendicularly to the base layer. Ensure they are evenly spaced and firmly tied together with string. Repeat this process as many times as needed to achieve the desired height.
5. Stabilize with Ladders
For safety and ease of access, place ladders along the length of the scaffolding. They provide a sturdy means of climbing and help maintain balance during work.
6. Reinforce for Strength
As the scaffolding grows taller, consider adding additional string connections or bamboo supports for reinforcement. This enhances the overall stability and prevents buckling or collapse.
Assembling the Base
To assemble the base of your scaffolding, follow these steps:
- Place a block of your chosen material (e.g., wood, cobblestone) on the ground.
- Place two additional blocks directly above the first block, one on each side, to form an “L” shape.
-
- Optional: If you want to create a wider base, you can place additional blocks perpendicular to the first two blocks, creating a “T” or “H” shape.
- Important: Ensure that the base is stable and can support the weight of the scaffolding you intend to build.
| Material |
Advantages |
Disadvantages |
| Wood |
– Easily obtainable
– Lightweight |
– Less durable |
| Cobblestone |
– More durable
– More difficult to obtain |
– Heavier |
| Stone |
– Most durable
– Requires mining |
– Heaviest |
Extending the Heights
To extend the scaffold to higher levels, follow the steps below:
- Place a scaffold block on top of the existing tower.
- Attach a ladder to the side of the scaffold block, facing the direction you want to extend.
- Climb the ladder and place a new scaffold block on the top of the tower, two blocks higher than the previous one.
- Repeat steps 1-3 until you reach the desired height. Ensure that the ladder is always attached to the outermost scaffold block of the tower as you extend upwards.
Alternatively, you can use the following method to extend the scaffold’s height more efficiently:
- Build a 2×2 tower of scaffold blocks at the base of the existing scaffold.
- Place a ladder on one of the sides of the tower.
- Climb the ladder and place a new 2×2 tower on top of the scaffold, making sure it aligns with the existing structure.
- Continue stacking 2×2 towers of scaffold blocks and extending the ladder upwards until you reach the desired height.
| Method
| Advantages
| Disadvantages
|
| Stacking individual scaffold blocks
| More flexible, allows for precise positioning
| Slower and requires more resources
|
| Stacking 2×2 towers of scaffold blocks
| Faster, uses fewer resources
| Less flexible, may not always be possible to align perfectly
Providing Support and Stability
Scaffolding provides essential support and stability to structures in Minecraft. Here’s how to create and utilize it effectively:
1. Crafting Scaffolding
To craft scaffolding, place 6 bamboo sticks in a vertical column in the crafting grid.
2. Placing Scaffolding
Position the scaffolding block next to the structure you want to support. It can be placed on the ground, walls, or ceilings.
3. Extending Scaffolding
To extend the scaffolding, place another block directly on top of the existing one. This can be repeated indefinitely to create tall structures.
4. Connecting Scaffolding
Scaffolding can be connected laterally by placing a block next to an existing one on the same level. This creates a secure platform for working at different heights.
5. Advanced Scaffolding Features
Scaffolding offers additional features to enhance its functionality:
- Flexibility: Scaffolding can bend around corners, allowing access to hard-to-reach areas.
- Stability: Unlike ladders, scaffolding provides a stable platform with a flat surface to stand or place blocks.
- Removable: Scaffolding can be easily broken and removed by punching it, making it convenient to adjust or dismantle structures.
By understanding the basics and advanced features of scaffolding, players can effectively build structures with greater ease and safety in Minecraft.
Materials Required
To build a scaffolding in Minecraft, you will need the following materials: scaffolding blocks, ladders, trapdoors, and signs.
Installing Ladders and Access Points
Creating Ladder Access Points
To create ladder access points, simply place ladders on the scaffolding blocks. You can place ladders on the sides or on the top of the scaffolding blocks, depending on your preference.
Trapped Ladder Access Points
To create trapped ladder access points, place a trapdoor on the top of a ladder. This will create a ladder that can be used to access the scaffolding, but it will also prevent mobs from climbing up the ladder.
Signs for Orientation
To help you keep track of where you are on the scaffolding, you can place signs on the scaffolding blocks. You can write a different name or label on each sign to indicate different sections or levels of the scaffolding.
| Scaffolding Block Type |
Crafting Recipe |
| Bamboo Scaffolding |
6 Bamboo |
| Iron Scaffolding |
1 Iron Ingot + 6 Iron Nuggets |
| Stone Scaffolding |
6 Stone Blocks |
To create a scaffolding block, simply place the required materials in a crafting grid in the following pattern:
[Resource] [Resource] [Resource]
[Resource] [Resource] [Resource]
[Resource] [Resource] [Resource]
Reinforcing the Structure
In order to ensure that your scaffolding is stable and secure, it is important to take the necessary steps to reinforce its structure. Here are seven key steps to consider:
-
Evaluate the Ground Conditions
Start by assessing the ground conditions on the construction site. Soft or uneven ground can compromise the stability of the scaffolding, necessitating additional reinforcement measures to prevent it from sinking or shifting.
-
Reinforce the Base of the Scaffolding
The foundation of the scaffolding should be robust and well-supported to withstand the weight of the structure and the workers on it. Consider using wider planks or thicker beams at the base to distribute the load evenly.
-
Add Diagonal Bracing
Diagonal bracing consists of cross-members installed diagonally between the vertical supports to improve lateral stability and prevent swaying. These braces act as triangulated trusses, distributing the load across the structure and reducing the risk of collapse.
-
Incorporate Tie-Ins and Anchors
Tie-ins connect the scaffolding to a stable and permanent structure, such as a wall or a building. Anchors are similar to tie-ins, but they extend into the ground to provide additional stability. Both these measures contribute to preventing the scaffolding from toppling over.
-
Install Guardrails and Toeboards
Guardrails and toeboards are essential safety features to prevent falls. Guardrails are installed along the edges of the platform to keep workers from stepping off, while toeboards prevent objects from falling through the gaps in the platform.
-
Use Scaffolding Jacks
Scaffolding jacks, also known as screw jacks or leveling jacks, are adjustable supports that can be placed under the base of the scaffolding to level it on uneven ground or compensate for sloping surfaces.
-
Seek Professional Assistance
If you encounter any uncertainties or challenges in reinforcing the structure of your scaffolding, do not hesitate to seek guidance from experienced professionals such as engineers or scaffolding contractors. Their expertise can ensure that your scaffolding is safe and compliant with relevant standards.
Safety Considerations
When working with scaffolding in Minecraft, it’s crucial to prioritize safety to prevent accidents and injuries. Here are some key considerations to keep in mind:
1. Use Strong Materials: Ensure that the materials used to construct the scaffolding are sturdy and reliable. This includes planks, ladders, and support blocks.
2. Create a Stable Base: Begin by creating a stable base on the ground to support the scaffolding. Use multiple blocks to spread out the weight and prevent wobbling.
3. Secure the Scaffolding: Connect the scaffolding to the building or structure you’re working on for additional support. Use ladders and blocks to anchor the structure.
4. Avoid Overloading: Be mindful of the weight limit of the scaffolding. Avoid overloading it with blocks, items, or excess materials.
5. Use Ladders Safely: When using ladders, ensure they are secure and properly placed. Always face the ladder while climbing and avoid overreaching.
6. PPE and Clear Communication: Wear necessary personal protective equipment (PPE) such as safety helmets to protect yourself from falling objects. Communicate clearly with anyone working on or around the scaffolding.
7. Inspect Regularly: Regularly check the integrity of the scaffolding, looking for any signs of wear, damage, or instability. Promptly address any issues identified during inspections.
8. Emergency Exit Plan: In case of an emergency, such as a fire or earthquake, have a clear exit plan in place. Identify multiple escape routes and inform everyone working on the scaffolding of the plan.
| Scaffolding Safety Checklist |
|
| Strong Materials: |
✔️ Verify plank and ladder sturdiness. |
| Stable Base: |
✔️ Use multiple blocks for support. |
| Secure Scaffolding: |
✔️ Anchor to building with ladders and blocks. |
| Weight Management: |
✔️ Avoid overloading with materials. |
| Ladder Safety: |
✔️ Secure and position ladders correctly. |
| PPE and Communication: |
✔️ Wear helmets and communicate clearly. |
| Regular Inspections: |
✔️ Check for wear, damage, and instability. |
| Emergency Exit Plan: |
✔️ Have multiple escape routes and inform workers. |
Troubleshooting Common Issues
Why is my scaffolding not placing correctly?
Ensure that you are standing on a solid block and that there is nothing obstructing the placement of the scaffolding. The scaffolding will only place on the side of the block that you are facing.
Why is my scaffolding falling apart?
Scaffolding will fall apart if it is not properly supported. Make sure that each section of scaffolding is connected to at least two other sections. You can also use scaffolding planks to add additional support.
Why can’t I place scaffolding on certain blocks?
Scaffolding cannot be placed on certain blocks, such as slabs, stairs, and fences. This is because these blocks do not provide a solid surface for the scaffolding to attach to.
Why is my scaffolding not extending?
Scaffolding will only extend up to a certain height. The maximum height is 6 blocks. If you try to extend the scaffolding beyond this height, it will not work.
Why is my scaffolding not connecting to other scaffolding?
Make sure that the scaffolding pieces are facing each other and that they are close enough to connect. The scaffolding will only connect if the pieces are within 1 block of each other.
Why is my scaffolding breaking when I jump on it?
Scaffolding is not very durable and can break if you jump on it too hard. Be careful when jumping on scaffolding, and avoid jumping from high heights.
Why is my scaffolding floating in the air?
If your scaffolding is floating in the air, it is likely because it is not properly supported. Make sure that each section of scaffolding is connected to at least two other sections. You can also use scaffolding planks to add additional support.
Why is my scaffolding disappearing?
Scaffolding will disappear if it is not placed on a solid block. Make sure that you are placing the scaffolding on a solid block, such as dirt, stone, or wood.
Why is my scaffolding turning into a different color?
Scaffolding will turn into a different color if it is placed in a different biome. For example, scaffolding will turn into a brown color if it is placed in a desert biome.
| Biome |
Scaffolding Color |
| Plains |
White |
| Forest |
Green |
| Desert |
Brown |
| Tundra |
Gray |
| Savanna |
Yellow |
| Taiga |
Dark Green |
| Swamp |
Brown |
| Mesa |
Red |
Advanced Techniques for Complex Structures
10. Using Slabs and Stairs to Create Curves
Slabs and stairs can be used to create curves and arches in scaffolding. By placing slabs or stairs at angles, you can create smooth, curved surfaces. This technique is particularly useful for creating domes or other complex structures.
Here is a table summarizing how to use slabs and stairs to create curves:
| Block |
Orientation |
Result |
| Slab |
Horizontal |
Flat surface, can be used to create plateaus |
| Slab |
Vertical |
Upward-facing step, can be used to create stairs |
| Slab |
Diagonal |
Smooth curve, can be used to create arches and domes |
| Stair |
Horizontal |
Step, can be used to create stairs or ramps |
| Stair |
Vertical |
Upward-facing step, can be used to create stairs |
| Stair |
Diagonal |
Curved surface, can be used to create arches and domes |
How to Make a Scaffolding in Minecraft
Scaffolding is a versatile and useful block in Minecraft that can be used for a variety of purposes, from building towers to creating bridges. It is relatively easy to make, and can be crafted with a few simple materials.
To make a scaffolding, you will need the following:
Once you have gathered your materials, follow these steps to craft a scaffolding:
- Open your crafting table.
- Place the bamboo in the crafting grid in the following pattern:
###
# #
###
- Place the string in the center of the crafting grid.
- Drag the scaffolding from the crafting grid into your inventory.
People Also Ask
How do you use scaffolding in Minecraft?
To use scaffolding, simply place it on the ground or on an existing structure. You can then climb up the scaffolding by right-clicking on it. Scaffolding can be used to reach high places, create bridges, or build towers.
How do you break scaffolding in Minecraft?
To break scaffolding, simply hit it with any tool. Scaffolding will break instantly, regardless of the tool used.
Can you place blocks on scaffolding in Minecraft?
Yes, you can place blocks on scaffolding. However, the blocks will not be supported by the scaffolding and will fall if there is no other support below them.
|
